Adapter Pattern
✅ Adapter Pattern
아래의 문서를 구입하여 영어 문서를 번역하고 이해한 것을 바탕으로 글을 작성하고 있습니다.
https://www.raywenderlich.com/books/design-patterns-by-tutorials/v3.0/chapters/12-adapter-pattern
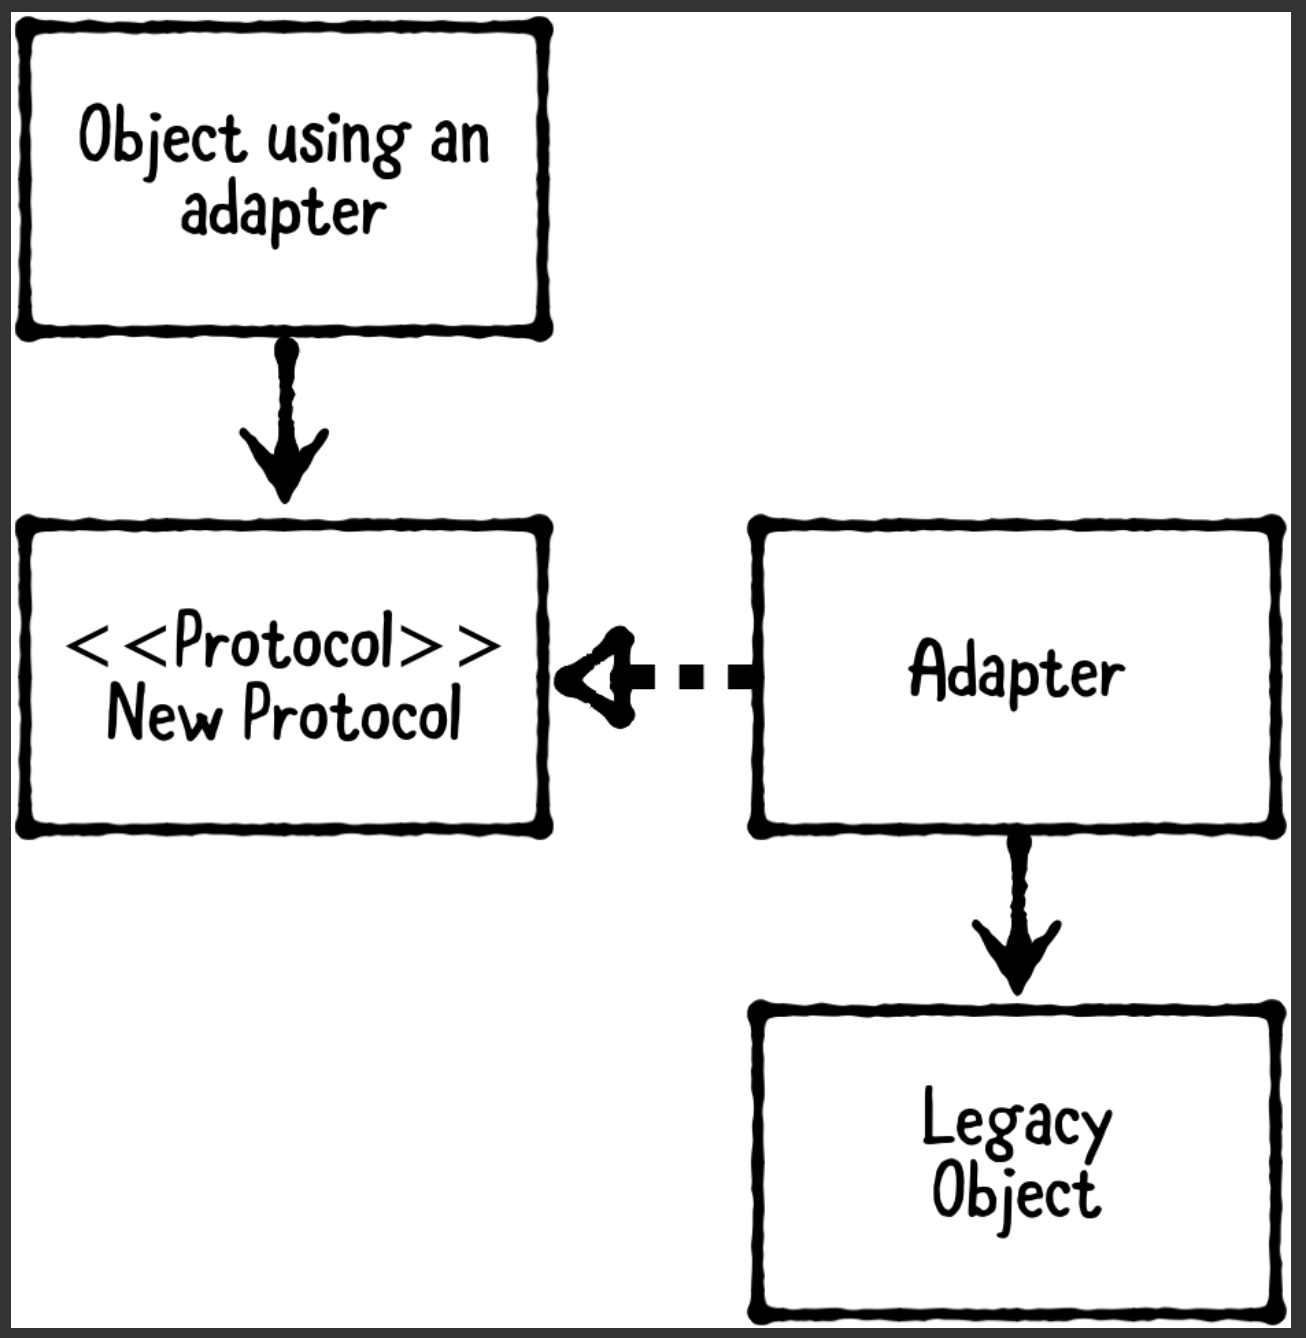
어댑터 패턴은 호환되지 않는 유형이 합께 작동하도록 만들어주는 패턴입니다. 여기에는 네가지 구성요소가 있습니다.
1. object using an adapter는 새로운 프로토콜에 의존하는 객체입니다.
2. new protocol은 사용하고자 하는 프로토콜입니다.
3. legact object는 프로토콜이 만들어지기 전에 이미 존재하는 객체이며, 프로토콜에 맞게끔 직접 수정할 수 없습니다.
4. adapter는 프로토콜을 준수하도록 생성되고 레거시 객체에 호출을 전달하는 역할을 합니다.
아이폰에서 헤드폰 잭이 없어지면서 라이트닝 포트에 연결해야 하는데, 어댑터가 필요하다.
When should you use it?
클래스, 모듈 및 함수는 특히 외부 라이브러리를 사용하여 가져온 경우 항상 수정할 수 있지는 않습니다. 이런 경우에는 수정 대신에 적응해야 할 필요가 있습니다.
기존 클래스를 확장하거나 새 어댑터 클래스를 생성하여 어댑터를 생성할 수 있습ㄴ디ㅏ. 이 장에서는 두 가지 모두 수행하는 방법을 보여줍니다.
Playground example
이 예시에서는 앱의 내부 인증 프로토콜과 함께 작동하도록 구글(타사) 인증 서비스를 조정합니다!
코드 예제 뒤에 다음 코드를 추가하세요
import UIKit
// MARK: - Legacy Object
public class GoogleAuthenticator {
public func login(
email: String,
password: String,
completion: @escaping (GoogleUser?, Error?) -> Void) {
// Make networking calls that return a token string
let token = "special-token-value"
let user = GoogleUser(email: email,
password: password,
token: token)
completion(user, nil)
}
}
public struct GoogleUser {
public var email: String
public var password: String
public var token: String
}
GoogleAuthenticator은 수정할 수 없는 서드 파티 클래스입니다. 그러므로 이것은 레거시 오브젝트에 해당합니다. 당연히 실제 구글 인증자는 훨씬 더 복잡하나 우리는 이것을 예시로 "Google"이라고 명명하고 네트워킹 호출을 가짜로 지정하자.
로그인 함수는 토큰이라는 가진 문자열 속성을 가진 Google 사용자를 반환합니다. GET 요청을 통해 이 토큰을 전달할 수 있습니다.
https://api.example.com/items/id123?token=special-token-value
또는 JSON [웹토큰](https://jwt.io/)과 같은 Bearer 인증을 통해 이를 사용할 수 있습니다. 이러한 형식에 익숙하지 않아도 괜찮다! 이 장에서 필요한 지식은 아니지만 일반적은 사용 사례를 설명하기만 하면 됩니다.
다음으로 아래의 코드를 추가합니다.
// MARK: - New Protocol
public protocol AuthenticationService {
func login(email: String,
password: String,
success: @escaping (User, Token) -> Void,
failure: @escaping (Error?) -> Void)
}
public struct User {
public let email: String
public let password: String
}
public struct Token {
public let value: String
}
이것은 새 프로토콜 역할을 하는 앱의 인증 부분을 담당하는 프로토콜입니다. 이메일과 비밀번호가 필요합니다. 만약 로그인이 성공하면 success를 호출하고 그 안에는 User와 Token이 있습니다. 반면에 실패하면 failure를 호출하고 그 안에는 Error가 있습니다.
앱은 직접 GoogleAuthenticator 프로토콜을 사용하며 그렇게 함으로써 많은 이점을 얻습니다. 예를들어 Google, Facebook 등의 여러 인증 메커닌즘을 모두 동일한 프로토콜을 준수하도록 하면 쉽게 지원할 수 있습니다.
Google Authenticator를 확장하여 Authentication Service(어댑터 패턴의 한 형태이기도 한 인증 서비스)를 준수할 수 있습니다.
어댑터 클래스를 생성할 수도 있으며, 다음 코드를 추가합니다.
// MARK: - Adapter
// 1
public class GoogleAuthenticatorAdapter: AuthenticationService {
// 2
private var authenticator = GoogleAuthenticator()
// 3
public func login(email: String,
password: String,
success: @escaping (User, Token) -> Void,
failure: @escaping (Error?) -> Void) {
authenticator.login(email: email, password: password) {
(googleUser, error) in
// 4
guard let googleUser = googleUser else {
failure(error)
return
}
// 5
let user = User(email: googleUser.email,
password: googleUser.password)
let token = Token(value: googleUser.token)
success(user, token)
}
}
}
순서마다 어떤 작업을 하는지!
1. GoogleAuthenticationAdapter와 AuthenticationService 사이에 GoogleAuthenticationAdapter를 adpter를 통해서 생성합니다.
2. GoogleAuthenticator를 private reference로 선언하여 외부 사용자에게 보이지 않습니다.
3. AuthenticationService 프로토콜에서 요구하는 대로 로그인 방법을 추가합니다. 이 메소드 내에서 Google의 메소드를 호출하여 Google 사용자를 가져옵니다.
4.프로토콜에서 필요한 대로 Authentication Service를 로그인 방법을 추가합니다. 이 메소드 내에서 Google의 로그인 메소드를 호출하여 Google 사용자를 가져옵니다.
5. 만약 error가 있다면 failuer를 함께 호출합니다.
5. 그렇지 않다면 googleUser에서 success를 반환한 상태에서 token을 만듭니다.
Google Authenticator를 이렇게 래핑하면 최종 소비자가 Google의 API와 직접 상호 작용할 필요가 없습니다. 이 기능은 향후 변경 사항으로부터 보호합니다. 예를 들어, Google이 API를 변경했는데 앱이 고장난 경우 이 어댑터만 수정하면 됩니다.
아래 코드를 추가하세요.
// MARK: - Object Using an Adapter
// 1
public class LoginViewController: UIViewController {
// MARK: - Properties
public var authService: AuthenticationService!
// MARK: - Views
var emailTextField = UITextField()
var passwordTextField = UITextField()
// MARK: - Class Constructors
// 2
public class func instance(
with authService: AuthenticationService)
-> LoginViewController {
let viewController = LoginViewController()
viewController.authService = authService
return viewController
}
// 3
public func login() {
guard let email = emailTextField.text,
let password = passwordTextField.text else {
print("Email and password are required inputs!")
return
}
authService.login(
email: email,
password: password,
success: { user, token in
print("Auth succeeded: \(user.email), \(token.value)")
},
failure: { error in
print("Auth failed with error: no error provided")
})
}
}
위의 코드가 수행하는 작업은 다음과 같습니다.
1. 먼저 LoginViewController에 대한 새 클래스를 선언합니다. 여기에는 authService 속성과 이메일 및 암호에 대한 텍스트 필드가 있습니다. 실제 viewController에서 loadView에서 뷰를 생성하거나 각 뷰를 @IBOutlet으로 선언할 수 있습니다. 여기서는 단순성을 위해 새 UITextField 인스턴스로 설정합니다.
2. 그런 다음에 LoginViewController를 인스턴스화 하고 authService를 설정하는 메소드를 만듭니다.
3. 마지막으로 텍스트 필드의 이메일과 암호를 사용하여 authService.login을 호출하는 로그인 메소드를 만듭니다.
다음으로 이 코드를 추가하세요.
// MARK: - Example
let viewController = LoginViewController.instance(
with: GoogleAuthenticatorAdapter())
viewController.emailTextField.text = "user@example.com"
viewController.passwordTextField.text = "password"
viewController.login()
여기서 Google Authenticator Adapter를 authService로 전달하여 새 LoginView Controller를 생성하고, 전자 메일 및 암호 텍스트 필드에 대한 텍스트를 설정하고 로그인을 호출합니다.
콘솔에 아래와 같은 문자가 나타난 것을 확인할 수 있습니다!
Auth succeeded: user@example.com, special-token-value
만약 당신이 다른 API들을 사용 페이스북과 같은 로그인을 지원하고 싶다면, 여러분은 쉽게 그들에게, 잘 LoginViewController 정확히 똑같은 방식으로 대한 코드 변경을 요구하지 않고 그들을 사용하죠 어댑터게 만들 수 있습니다.
What should you be careful about?
어댑터 패턴을 사용하면 기본 유형을 변경하지 않고도 새 프로토콜을 준수할 수 있습니다. 이는 기본 유형에 대한 향후 변경 사항으로부터 보호하는 결과를 가져오지만, 구현을 읽고 유지 관리하는 데에도 어려움을 줄 수 있습니다.
실제로 변경될 가능성이 있다는 것을 인식하지 않는 한 어댑터 패턴을 구현하는 데 주의해야 합니다. 없는 경우 기본 유형을 직접 사용하는 것이 적절한지 고려하십시오.
(변경될 가능성이 거의 없는데 어댑터 패턴을 사용한다면, 낭비다!)
Tutorial project
이전 장의 프로젝트인 Coffee Quest를 사용합니다. 그리고 이번 목표는 Yelp SDK에서 앱을 분리하는 어댑터 클래스를 만들 예정입니다.
(쿠링에서 SDK를 분리한 것도 이와 비슷한 패턴 같다고 느껴지기도 한다!)
https://github.com/lgvv/DesignPattern/tree/main/adapter-pattern/CoffeeQuest
Key points
이 장에서는 어댑터 패턴에 대해서 같이 알아보았습니다. 핵심 사항은 아래의 내용과 같습니다!
1. Adapter 패턴은 수정할 수 없는 서드 파티 라이브러리의 클래스로 작업할 시 유용합니다. 프로토콜을 사용하여 프로젝트에서 사용자가 직접 정의한 클래스와 함께 작동하도록 할 수 있습니다.
2. 어댑터를 사용하려면 레거시 객체를 extension하거나 새 어댑터 클래스를 만들 수도 있습니다.
3. 어댑터 패턴을 사용하려면 필수 구성 요소가 없거나 필수 객체와 호환되지 않는 구성 요소가 있는 경우에도 클래스를 재사용할 수 있습니다.
4. '시간의 역사'에서 스티븐 호킹은 "지능은 변화에 적응하는 능력이다"라고 말했다. 어댑터 패턴에 대해 정확히 말하지 않았을 수도 있지만, 이 아이디어는 이 패턴과 다른 많은 요소에서 중요한 구성 요소입니다. 즉, 미래의 변화를 미리 계획하세요!
'apple > DesignPattern & Architecture' 카테고리의 다른 글
[Swift] Prototype Pattern (0) | 2022.05.28 |
---|---|
[Swift] Iterator Pattern (0) | 2022.05.13 |
[Swift] Factory Pattern (0) | 2022.05.08 |
[Swift] MVVM Pattern (0) | 2022.04.26 |
[Swift] Builder Pattern (0) | 2022.04.22 |