RxSwift 스터디 7주차 Combining Observables
목차
1. Concatenation
- startwith
- concat
- concatMap
2. Combining Elements
- Combine Latest
- zip
3. Trigger
- withLatestFrom
4. Switches
- ambiguous
- switchLatest
5. Combining Elements within a Sequence
- reduce
- scan
6. 공식문서를 기반으로 Combining Observables
- join : 공식문서에는 있지만 rxswift에서는 사용 안됨.
- And/Then/When
startwith

        print(" ===== stratwith =====" )
        Observable.of(2,3,4)
            .startWith(1)
            .subscribe(onNext : { print($0) })

// 결과값
1
2
3
4
concat
- startWith는 concat에서 파생되어 나온 것.
- 두 sequence를 이어주는 역할


        print(" ===== concat =====" )
        let first = Observable.of(1,2,3)
        let second = Observable.of(4,5,6)

        Observable
            .concat([first,second])
            .subscribe(onNext : { print($0) })
            .disposed(by: disposeBag)

// 결과값
1
2
3
4
5
6
concatMap
- concatMap은 flatMap과 비슷하다.
- 하나의 subscribe가 완료되어야 다음 subscribe로 넘어간다.
        print(" ===== concatMap =====" )
        let sequences = [
            "Germany" : Observable.of("Berlin","Munich","FrankFrut"),
            "Spain" : Observable.of("Madrid","Barcelona","Valencia")
        ]

        Observable.of("Germany","Spain")
            .concatMap { country in
                sequences[country] ?? .empty()
            }
            .subscribe(onNext : { string in
                print(string)

            })

// 결과값
Berlin
Munich
FrankFrut
Madrid
Barcelona
Valencia
Merging
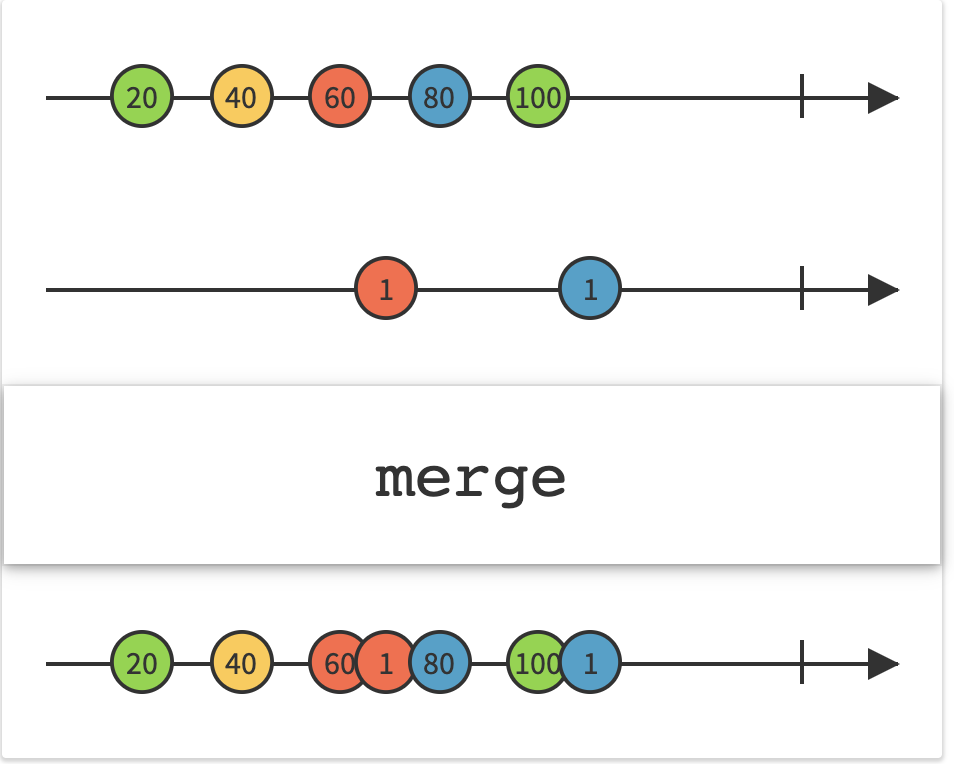
- 순서대로 합쳐준다.
- 여기서 주의할 점은 , error처리가 되는 부분에 유의


        print(" ===== merge ===== ")
        let left = PublishSubject<String>()
        let right = PublishSubject<String>()

        let source = Observable.of(left.asObservable(),right.asObservable())
        let observable = source.merge()
        let disposable = observable.subscribe(onNext : {value in
            print(value)
        })

        var leftValues = ["Berlin","Munich","FrankFrut"]
        var rightValues = ["Madrid","Barcelona","Valencia"]

        repeat{
            if arc4random_uniform(2) == 0{
                if !leftValues.isEmpty {
                    left.onNext("Left : " + leftValues.removeFirst())
                }
            }
            else if !rightValues.isEmpty {
                right.onNext("Right : " + rightValues.removeFirst())
            }
        }while !leftValues.isEmpty || !rightValues.isEmpty

        disposable.dispose()

// 결과값
Left : Berlin
Right : Madrid
Left : Munich
Left : FrankFrut
Right : Barcelona
Right : Valencia
CombineLatest
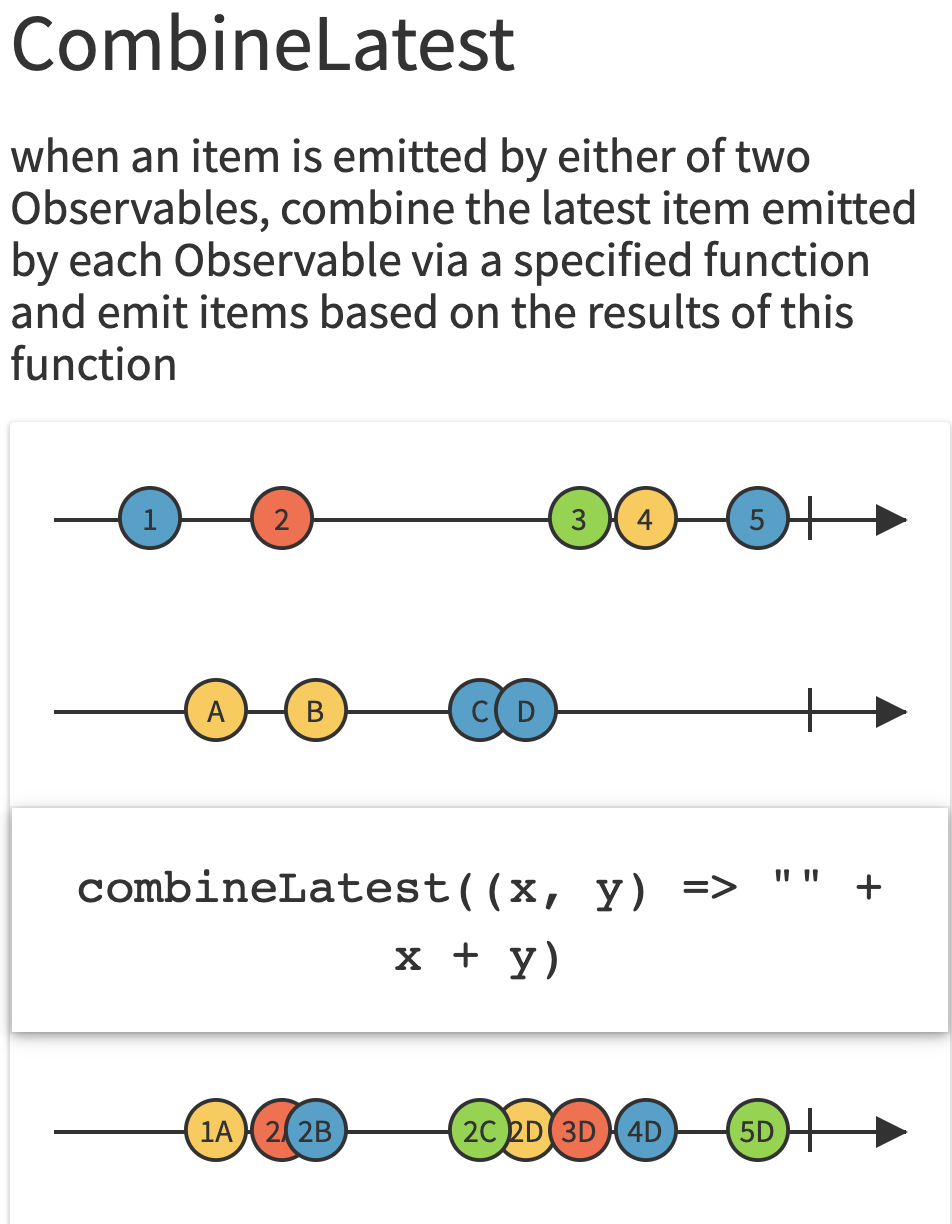
- 두 항목을 합치는데, 다른 한쪽의 값을 가장 최근의 값으로 사용하여 합친다.
- 타입이 달라도 적용할 수 있다.

        print(" ===== combineLatest ===== ")
        Observable
            .combineLatest(left,right) { lastLeft, lastRight in
                "\(lastLeft)\(lastRight)"
            }
            .subscribe(onNext: { print($0) })
            .disposed(by: disposeBag)

        print("> Sending a value to Left")
        left.onNext("Hello,")

        print("> Sending a value to Right")
        right.onNext("world")

        print("> Sending another value to Right")
        right.onNext("RxSwift")

        print("> Sending another value to Left")
        left.onNext("Have a good day")


// 결과값
> Sending a value to Left
Hello,
> Sending a value to Right
world
Hello,world


        print(" ===== combineLatest(다른타입) ===== ")
        let choice : Observable<DateFormatter.Style> = Observable.of(.short,.long)

        let dates = Observable.of(Date())

        let observable = Observable.combineLatest(choice,dates) { (format,when) -> String in
            let formatter = DateFormatter()
            formatter.dateStyle = format
            return formatter.string(from: when)
        }

        observable.subscribe(onNext : { value in
            print(value)
        })


// 결과값
7/11/21
July 11, 2021
> Sending another value to Right
RxSwift
Hello,RxSwift
> Sending another value to Left
Have a good day
Have a good dayRxSwift
zip
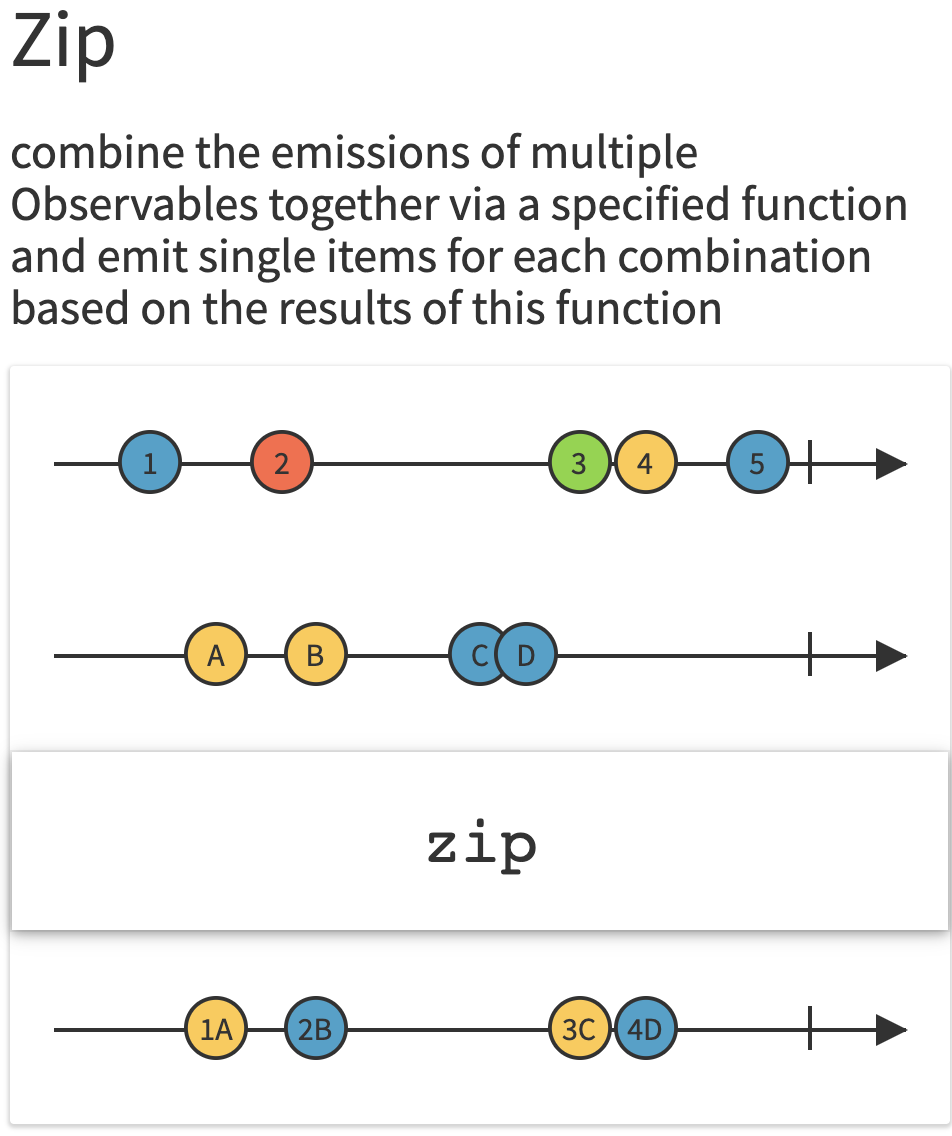
- combinLatest와 비슷하나 얘는 1:1 매칭이 되어야지만 방출된다.

        print(" ===== zip ===== ")

        let zipleft : Observable<Weather> = Observable.of(.sunny,.cloudy,.cloudy,.sunny)
        let zipright = Observable.of("Lisbon","Copenhagen","London","Madrid","Vienna")
        Observable
            .zip(zipleft,zipright) {  weather, city in

                return "It's \(weather) in \(city)"
            }
            .subscribe(onNext : { print($0) })
            .disposed(by: disposeBag)


// zip
It's sunny in Lisbon
It's cloudy in Copenhagen
It's cloudy in London
It's sunny in Madrid
withLatestFrom
- 버튼을 두번 탭해서 가장 최신 상태를 유지시켜주는 것을 의미한다.

// 선언부
enum Weather {
    case cloudy
    case sunny
}

// 구현부
        print(" ===== withLatestFrom ===== ")
        let button = PublishSubject<Void>()
        let textField = PublishSubject<String>()

        button
            .withLatestFrom(textField)
            .subscribe(onNext : {value in
                print(value)
            })

        textField.onNext("Par")
        textField.onNext("Pari")
        textField.onNext("Paris")
        button.onNext(())
        button.onNext(())

// 결과값
Paris
Paris
ambiguous
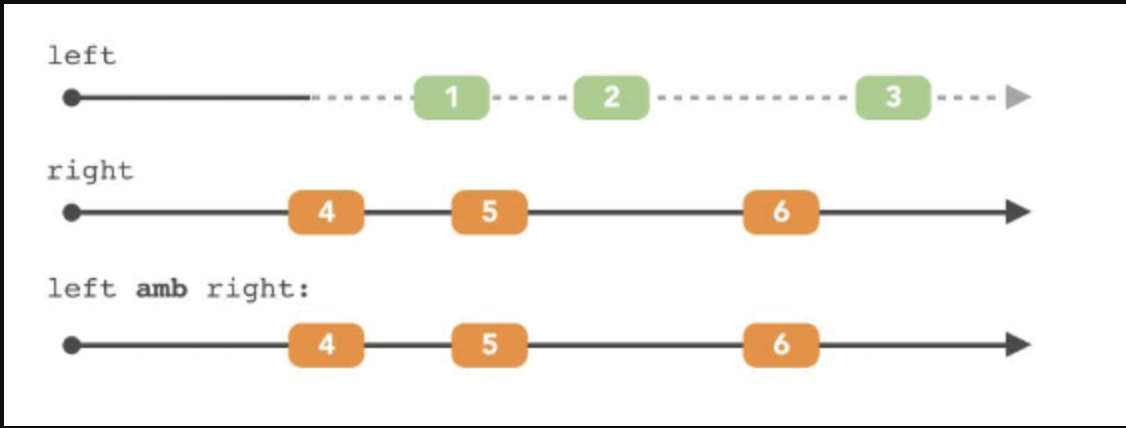
- ambiguous 에서는 여러 개를 ambiguous하게 subscribe 하고 있다가 가장 먼저 방출되는 원소를 확인하고 그 subject만 subscribe합니다

        print(" ===== ambiguous ===== ")
        let ambleft = PublishSubject<String>()
        let ambright = PublishSubject<String>()
        ambleft.amb(ambright)
            .subscribe(onNext : { print($0) })
            .disposed(by: disposeBag)

        ambleft.onNext("Lisbon")
        ambright.onNext("Copenhagen")
        ambleft.onNext("London")
        ambleft.onNext("Madrid")
        ambright.onNext("Vienna")

// 결과값
Lisbon
London
Madrid
switchLatest
- 이건 스위치랑 사용법이 비슷한데, 가장 최근에 방출된 원소를 switch해준다.
- publishSubject를 사용하면 어차피 이전 값에 대한 정보가 저장되지 않아 자연스럽게 최신 정보를 반영하지만 다른 서브젝트들은 이전 값도 갖고 있어서 이걸 사용하면 가장 최근값 1개만 사용할 수 있다.

        print(" ===== switchLatest ===== ")
        let one = PublishSubject<String>()
        let two = PublishSubject<String>()
        let three = PublishSubject<String>()

        let source = PublishSubject<Observable<String>>()

        source
            .switchLatest()
            .subscribe(onNext : { print($0) })
            .disposed(by: disposeBag)

        source.onNext(one)
        one.onNext("Some text from sequence one")
        two.onNext("Some text from sequence two")

        source.onNext(two)
        two.onNext("More text from sequence two")
        one.onNext("and also from sequence one")

        source.onNext(three)
        two.onNext("Why don't you see me?")
        one.onNext("I'm alone, help me")
        three.onNext("Hey it's three. I win.")

        source.onNext(one)
        one.onNext("Nope it's me, one!")


// 결과값
Some text from sequence one
More text from sequence two
Hey it's three. I win.
Nope it's me, one!
reduce
- reduce는 sequence를 진행하면서 어떤 수행을 해주며 마지막 값만 방출한다.

        print(" ===== reduce ===== ")
        Observable.of(1,2,3,4,5)
            .reduce(0, accumulator: +)
            .subscribe(onNext : { print($0) })
            .disposed(by: disposeBag)

        print(" ===== reduce ex2 ===== ")
        Observable.of(1,2,3,4,5)
            .reduce(0, accumulator: { sum, value in
                return sum + value
            })
            .subscribe(onNext : { print($0) })
            .disposed(by: disposeBag)

 //결과값
  ===== reduce =====
15
 ===== reduce ex2 =====
15

둘이 같으나 클로저를 통해 다른 작업할 수도 있다
scan
- 스캔은 다른 시간에도 보았지만, 결과값 하나하나를 보여준다!

        print(" ===== scan ===== ")
        Observable.of(1,2,3,4,5)
            .scan(0, accumulator: +)
            .subscribe(onNext : { print($0) })
            .disposed(by: disposeBag)

// 결과값
1
3
6
10
15
'apple > RxSwift, ReactorKit' 카테고리의 다른 글
| RxSwift - Relay와 Subject (0) | 2021.07.12 |
|---|---|
| RxSwift 스터디 8주차 Time Based Operators (cold, hot) (0) | 2021.07.12 |
| RxSwift 스터디 6주차 Transforming Observables (0) | 2021.07.10 |
| RxSwift 스터디 5주차 Filtering Observables (0) | 2021.07.10 |
| RxSwift 스터디 4주차 Subject (0) | 2021.07.10 |